This lab covers IPv4 static and static default routes. Static routes are a manual way of defining the path a packet should take in the network to get to its destination. The command to write a static route is ip route destination prefix destination prefix mask [outgoing interface | next hop IP address]. In regular terms after the ip route portion of the command it is where does the packet need to go and how is it going to get there. An administrative distance can be added to the end of the ip route command, but we will use that later in a “Floating Static Routes” lab example.
A static route can be written using the outgoing interface, next-hop address, or both based upon your needs. In this lab we will use outgoing interface or next-hop address (address of forwarding router) in the examples just as examples, for no particular reason.
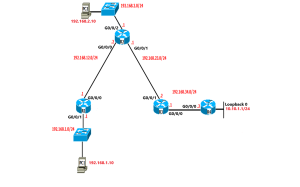
Before you start the static route configuration given, configure the router hostnames, IP addressing, and activate the interfaces. The Switches and PCs aren’t required, you can do an extended ping from the inside router interfaces (LAN interfaces) to the other addresses to test your routing. If you want to use the PCs but not the switches you can connect the PCs without Switches directly to the router.
We will begin with router R1 and work our way through the topology with static and static default routes to configure the static routing.
R1
Without routing you can ping between directly connected interfaces, for example pinging from R1 to 192.168.12.2 (which is on R2) will work, but to ping through a router (for example from R1 to 192.168.2.1 on R2) you need routing configured. On R1 configure static routes to route packets to external routes.
Write a static route for packets from R1 to get routed to the 192.168.2.0 network through R2, here we’ll use next-hop address as the destination.
R1(config)#ip route 192.168.2.0 255.255.255.0 192.168.12.2
You can now ping from R1 to 192.168.2.1, but if you ping from PC1 or do an extended ping from 192.168.1.1 it won’t work because R2 doesn’t know how to get to the 192.168.1.0 network.
Write a static route on R2 to get to the 192.168.1.0 LAN through R1. We’ll use next-hop address as the destination.
R2(config)#ip route 192.168.1.0 255.255.255.0 192.168.12.1
Finish the static routes on R1. We’ll use outgoing interface for the route going to 192.168.23.0 LAN and next-hop address for the 192.168.34.0 LAN. Then configure the other routers, except R4 you’ll configure static default route on R4. We will use a mix of outgoing interface and next-hop address in each route, no particular reason in the examples.
R1(config)#ip route 192.168.23.0 255.255.255.0 g0/0
R1(config)#ip route 192.168.34.0 255.255.255.0 192.168.12.2
R1(config)#ip route 10.10.1.0 255.255.255.0 192.168.12.2
R2
R2(config)# ip route 192.168.34.0 255.255.255.0 192.168.23.2
R2(config)#ip route 10.10.1.0 255.255.255.0 192.168.23.2
R3
R3(config)# ip route 192.168.12.0 255.255.255.0 192.168.23.1
R3(config)# ip route 192.168.2.0 255.255.255.0 g0/1
R3(config)# ip route 192.168.1.0 255.255.255.0 192.168.23.1
R3(config)#ip route 10.10.1.0 255.255.255.0 192.168.34.2
R4
Configure a static default route to get to all the routes on R1-R3. A default is used to forward all traffic the router doesn’t have a better route for. In a sense the route below says “any packets the router doesn’t know how to forward send to 192.168.34.1”.
R4(config)# ip route 0.0.0.0 0.0.0.0 192.168.34.1